
Follow this guide to build a high-performance web service that’s completely free to run forever. We’ll use Hugo (static site generator), GitHub (version control), and Cloudflare Pages (free hosting).
Table of Contents
- Why Free Web Hosting is Possible
- Tech Stack Overview
- Prerequisites
- Installing Hugo
- Creating a Project
- Installing a Theme
- Configuration File Setup
- Creating Your First Content
- Testing Locally
- Uploading to GitHub
- Deploying with Cloudflare Pages
- Conclusion
- References
Why Free Web Hosting is Possible
Do you think running a web service requires server costs?
With Hugo + GitHub + Cloudflare Pages:
- $0 Server Costs: Static sites don’t need a server
- Free Hosting: Cloudflare Pages free plan offers unlimited bandwidth
- Auto Deploy: Just git push and it updates automatically
- Global CDN: Fast speeds from anywhere in the world
- Free SSL: HTTPS is automatically enabled
Comparison with Other Platforms
| Comparison | Traditional Blogs | Hugo + GitHub |
|---|---|---|
| Cost | Free | Free |
| Customization | Limited | Unlimited |
| Data Ownership | Platform owns | 100% yours |
| SEO Control | Platform policy | Full control |
| Service Shutdown Risk | Exists | None |
| Developer Branding | Difficult | Portfolio ready |
| Difficulty | Easy | Initial setup required |
Why Choose Hugo
-
Complete Ownership: Your content, your data, your domain. Platform shutdown doesn’t affect you.
-
Developer Branding: A tech blog on your GitHub profile serves as a portfolio.
-
Real Skills: Naturally learn Git, CI/CD, Markdown and other industry skills.
-
Multilingual Support: Easy to build multilingual sites for global audiences.
This guide is based on Hugo’s Official Quick Start and Cloudflare Pages Documentation.
Tech Stack Overview
Let’s briefly look at the three core technologies.
 Free deployment pipeline combining Hugo, GitHub, and Cloudflare
Hugo: Static Site Generator
 Markdown files are converted to HTML through the Hugo engine
Hugo is the world’s fastest static site generator, written in Go.
| Feature | Description |
|---|---|
| Build Speed | Thousands of pages in under 1 second |
| Writing | Simple Markdown syntax |
| Themes | Hundreds of free themes available |
| Security | No database = minimal hacking risk |
GitHub: Version Control & Storage
Git tracks code change history, and GitHub stores it safely in the cloud.
- Restore to any previous version if something goes wrong
- Work across multiple devices with sync
- Connect to Cloudflare for automatic deployment
Cloudflare Pages: Free Hosting & Auto Deploy
 Push to GitHub and Cloudflare automatically builds and deploys
Cloudflare Pages connects to your GitHub repository to automatically build and deploy worldwide.
| Free Plan Benefits | Details |
|---|---|
| Cost | Completely free |
| Bandwidth | Unlimited |
| SSL | Automatic HTTPS |
| CDN | Global edge network |
Prerequisites
| Item | Required | Notes |
|---|---|---|
| macOS / Windows / Linux | Required | This guide uses macOS |
| Terminal | Required | For running commands |
| GitHub Account | Required | Free signup |
| Cloudflare Account | Required | Free signup |
| Code Editor (VS Code, etc.) | Recommended | For convenient content writing |
Installing Hugo
macOS (Using Homebrew)
Open Terminal and run these commands in order.
1. Install Homebrew if you don’t have it:
/bin/bash -c "$(curl -fsSL https://raw.githubusercontent.com/Homebrew/install/HEAD/install.sh)"
2. Install Hugo:
brew install hugo
3. Verify installation:
hugo version
You should see output similar to:
hugo v0.154.3+extended+withdeploy darwin/arm64 ...
Windows
Windows users, please refer to the official installation guide.
Creating a Project
# Create new Hugo site (in blog folder)
hugo new site blog

# Move to created folder
cd blog
Project Structure
 Basic folder structure of a Hugo project
| Folder/File | Purpose |
|---|---|
content/ |
Where content is stored |
content/page/ |
Static pages (About, Search, etc.) |
content/posts/ |
Blog posts |
assets/ |
Resources that need processing (images, SCSS) |
static/ |
Static files (favicon, logo, etc.) |
layouts/ |
Custom templates |
themes/ |
Theme files |
hugo.toml |
Main configuration file |
Installing a Theme
Browse Hugo Themes to find one you like. Hundreds of free themes are available.
Recommended Themes
| Theme | Features | Best For |
|---|---|---|
| Stack | Sidebar, widgets, card design | Ads/widgets |
| PaperMod | Simple, fast, popular | Minimal design |
| Blowfish | Modern, various layouts | Stylish design |
This site uses the Stack theme. It’s great for placing ad widgets in the sidebar and has well-organized archives/tags.
Why Use Git Submodule
Important: Always install themes using Git Submodule.
As recommended in Hugo’s official documentation:
- Separates theme code from your project code
- Easy updates with
git submodule update - Required for Cloudflare Pages deployment (regular copy causes errors)
Installation Commands
Stack theme (used on this site):
# Initialize Git repository
git init

# Add Stack theme as submodule
git submodule add https://github.com/CaiJimmy/hugo-theme-stack.git themes/hugo-theme-stack
Configuration File Setup
Open hugo.toml and replace with the following content. Comments explain each setting.
# ============================================
# Basic Settings
# ============================================
baseURL = 'https://yourdomain.pages.dev/'  # Change to actual URL after deployment
title = 'My Tech Blog'                      # Site title
theme = 'hugo-theme-stack'                  # Theme to use

# ============================================
# Language Settings
# ============================================
defaultContentLanguage = 'en'              # Default language: English
defaultContentLanguageInSubdir = true      # Use /en/, /ko/ prefixes in URL
enableRobotsTXT = true                     # Auto-generate robots.txt

# ============================================
# Search Feature (hugo-theme-stack built-in)
# ============================================
[outputs]
  home = ["HTML", "RSS", "JSON"]           # JSON required for search

# ============================================
# Language-specific Settings
# ============================================
[languages]
  # --- English ---
  [languages.en]
    languageCode = 'en-US'
    languageName = 'English'
    weight = 1

    [languages.en.params]
      description = 'Developer Tech Blog'
      mainSections = ["posts"]

    [[languages.en.menu.main]]
      name = "Archive"
      url = "/archives/"
      weight = 10
    [[languages.en.menu.main]]
      name = "Tags"
      url = "/tags/"
      weight = 20
    [[languages.en.menu.main]]
      name = "Search"
      url = "/search/"
      weight = 30

  # --- Korean ---
  [languages.ko]
    languageCode = 'ko-KR'
    languageName = '한국어'
    weight = 2

    [languages.ko.params]
      description = '개발자의 기술 블로그'
      mainSections = ["posts"]

    [[languages.ko.menu.main]]
      name = "Archive"
      url = "/archives/"
      weight = 10
    [[languages.ko.menu.main]]
      name = "Tags"
      url = "/tags/"
      weight = 20
    [[languages.ko.menu.main]]
      name = "Search"
      url = "/search/"
      weight = 30

# ============================================
# Stack Theme Settings
# ============================================
[params]
  # Site basic info
  description = 'Developer Tech Blog'
  mainSections = ['posts']

  # Sidebar settings
  [params.sidebar]
    emoji = ''
    subtitle = 'Dev Blog'

    [params.sidebar.avatar]
      enabled = true
      local = true
      src = 'images/avatar.png'

  # Comments (enable later)
  [params.comments]
    enabled = false

  # Footer settings
  [params.footer]
    since = 2026

  # Color settings
  [params.colorScheme]
    toggle = true
    default = 'auto'
Creating Your First Content
Creating Required Pages
Stack theme needs a few pages to work properly:
# Archive page (post list)
cat > content/archives.md << 'EOF'
---
title: "Archive"
layout: "archives"
summary: "archives"
---
EOF

# Search page
cat > content/search.md << 'EOF'
---
title: "Search"
layout: "search"
summary: "search"
---
EOF
Writing Your First Post
Using Leaf Bundle style (folder + index.md) makes image management easier:
# Create new post folder
hugo new content/posts/hello-world/index.md
Open the created content/posts/hello-world/index.md and write your content:
+++
date = '2026-01-08T10:00:00+09:00'
draft = false
title = 'Hello, this is my first post!'
tags = ["first", "Hugo"]
+++

## Introduction

This site was built with Hugo and Cloudflare Pages.

## Future Plans

- Share development experiences
- Write technical tutorials
Testing Locally
Let’s test locally before deploying:
hugo server -D
Visit http://localhost:1313 in your browser!
The
-Doption shows posts withdraft = true.
Uploading to GitHub
1. Create a New Repository on GitHub
- Log in to GitHub
- Click + button in top right → New repository
- Repository name:
my-blog(or your preferred name) - Choose Public or Private
- Click Create repository
2. Connect Local Project
# Create .gitignore (exclude build output)
echo "public/" >> .gitignore
echo "resources/" >> .gitignore
echo ".hugo_build.lock" >> .gitignore

# Connect to GitHub repository
git remote add origin https://github.com/username/my-blog.git

# First commit & push
git add .
git commit -m "Initial commit: Hugo blog setup"
git branch -M main
git push -u origin main
Deploying with Cloudflare Pages
1. Access Cloudflare Dashboard
Log in to https://dash.cloudflare.com.
2. Create New Pages Project
Step 1: Click the + button in top right and select Pages.
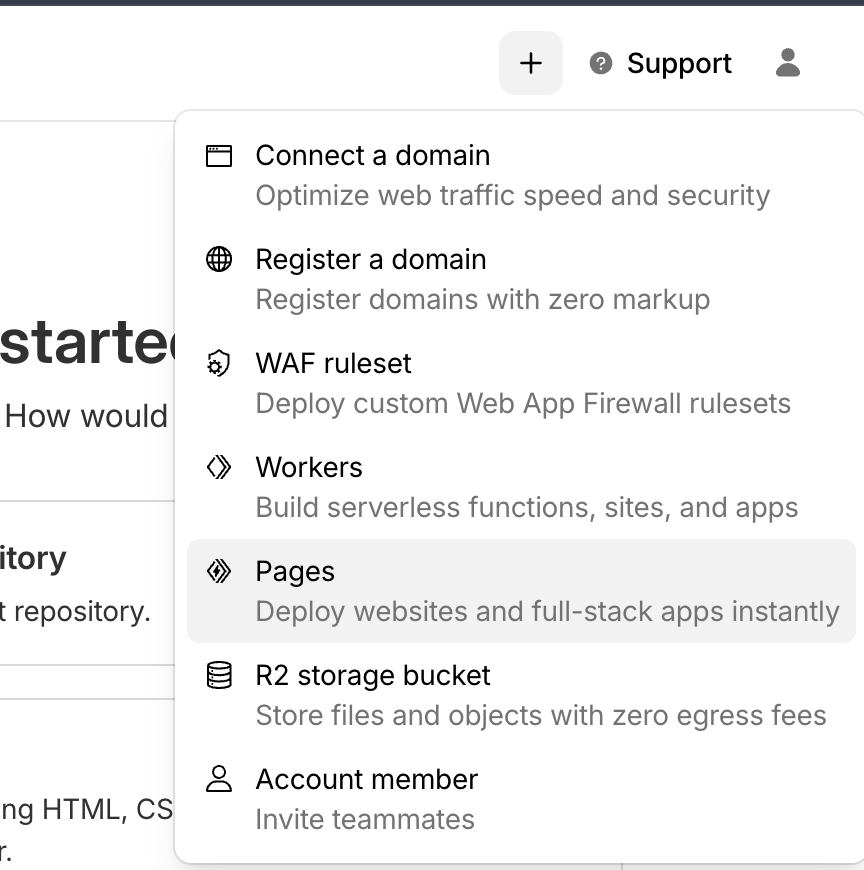 Select Pages from Cloudflare dashboard
Step 2: On the “Get started” screen, click Get started under Import an existing Git repository.
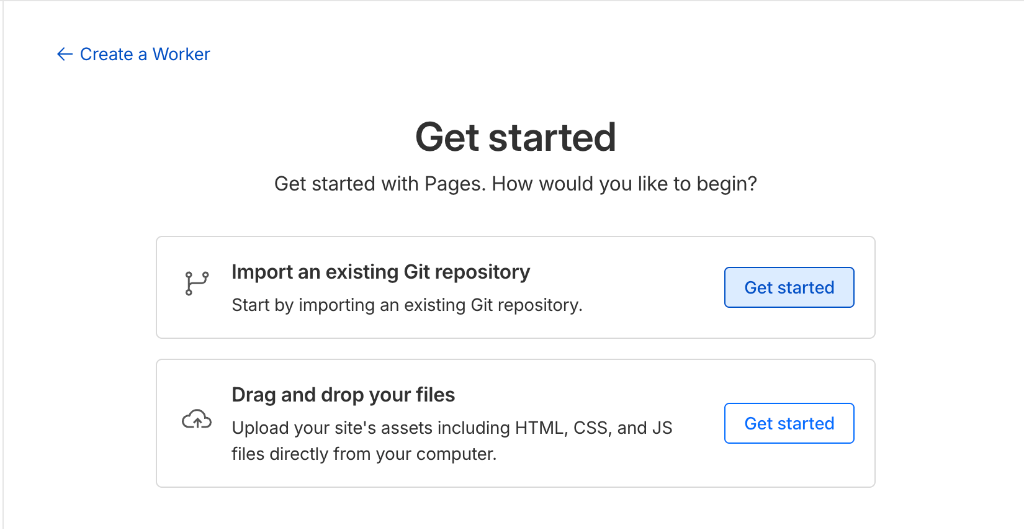 Select import Git repository option
Step 3: Connect your GitHub account and select the my-blog repository you just created.
First-time connection will show GitHub permission dialog. Click Authorize Cloudflare.
3. Build Settings
| Setting | Value |
|---|---|
| Framework preset | Hugo |
| Build command | hugo |
| Build output directory | public |
Important: In Environment Variables, set HUGO_VERSION to 0.154.3 (or your local version).
4. Start Deployment
Click Save and Deploy and the build will start automatically.
After a few minutes, you can access your site at https://projectname.pages.dev.
Conclusion
You now have a completely free environment:
| Item | Cost |
|---|---|
| Hugo | Free |
| GitHub | Free |
| Cloudflare Pages | Free |
| SSL Certificate | Free |
| CDN | Free |
| Monthly Total | $0 |
Next Steps
- Connect custom domain (e.g., myblog.com)
- Add comment system (Giscus, Utterances)
- SEO optimization
References
Official Documentation
Additional Learning
Questions or feedback? Leave a comment below!